

Toolkit Help
Registration and Login
The Accessible Events Toolkit can be used as a reference without the need to register or login. However, it is designed for users to check-off points about the accessibility of an event/venue and to make comments or notes as they go along. This requires users to register with the system, so that they can login using a computer, laptop, tablet or phone, and access their data. You can login with your Username or Email address.
Sections
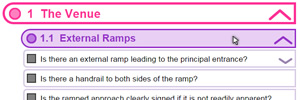 The Toolkit is in sections, with main headings in pink and sub-sections in purple. When clicked, these sections open up.
Their content is the check points for assessing an event or venue, composed of an introduction, key points and notes. The notes require a further click to expand them.
Clicking an open section causes it to close. Double clicking opens all the sub parts for a section.
Check Boxes
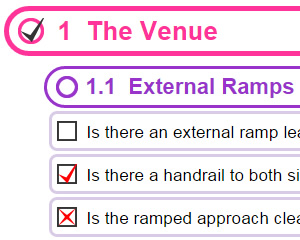 The bullet points for the Toolkit content are filled circles and squares. However, if you are logged in and have selected an event/venue to assess, then the bullet points become check boxes.
These have three states: blank; ticked; crossed. The boxes move from one state to the next each time they are clicked.
If you consider that you have dealt with a whole section or subsection, you can tick that off as complete. You can use the filter to see which sections and items you have completed or still have to investigate.
The values of the check boxes are stored for you as a user and can be returned to whenever you log in. If you allow the assessment to be public then other users can view the check boxes, but cannot alter them.
Comments
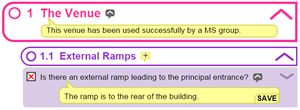 Comments or notes can be attached to any content item in the Toolkit, or to section headings. Typically these will be added as you assess an event or venue.
Click on the comment icon  and then simply type into the comment box. When you move away from the comment box to another part of the page or website, the comment will be saved, or you can click 'SAVE' to force this.
Your comments about the accessibility of a venue can be made public to help others, though you can keep them private if you want.
Content Filter
The contents of the page can be filtered so that you see only the items that you select as of interest.
Search: Enter a word or phrase to search for, click FIND and the items found will be opened with the search term highlighted.
Content: You can restrict the Toolkit to items relevant only to the Venue or only to the Event planning.
Checks: Allows you to display only the Check Boxes that are blank, or ticked or crossed.
Comments: Control whether comments are viewable or not.
Page: Reset all the above (they can be reset individually by clicking their descriptions); Open or Close all the sections; or Bookmark the settings for the page so that you can later View it with all the sections in the same state.
Venues Lists
There are two lists of Venues. The Venues list covers the main venues in the local area, which have been researched to provide details on facilities, transport and contacting. If Accessible Events Toolkit assessments have been made these will be listed, with links to the event and its assessment.
Other venues are listed in the user event assessments. This is a full searchable list of all Accessible Event Toolkit assessments that are open to public viewing. When these are added, users are encouraged to use a venue title that matches any already in use for a specific venue, so that all the relevant assessments can be grouped together.
Working Offline
If assessing a venue where there is no web connection it will be necessary to work offline. To do this, login as normal and go to the Assess Event page for the Toolkit and have the venue selected ready for assessment. At the bottom of the page click Offline Mode and the page will change to exclude any links that would take the user away from the loaded page - do not refresh the page or move to another web page. You can now use the Toolkit as normal, including tick boxes and comments. When you get to a location where there is a web connection click Save Online and the work you have done on the page will be saved.
If the web connection is lost while you are using the Toolkit online, then use of the tick boxes or comments will detect that there is no connection and the page will automatically go into the Offline Mode. If the web connection is restored the page will save the changes you have made to tick boxes and comments and automatically restore the normal webpage. However, in the automatic Offline Mode you can click Stay Offline at the bottom of the page and force the page to function offline - this may be useful if the web connection is unreliable.
With the Offline Mode option the web connection is unaffected, so the Status may still be shown as Online in the page banner. If the same user account is used simultaneously by more than one assessor then they should all log on before the Toolkit page is loaded and Offline Mode selected by any of them, and none should log off before all have saved their pages.
Printing
The Toolkit assessment page uses background images, these should print OK in Chrome and Safari. For Internet Explorer you will need to go to Tools / Print / Page Setup / tick 'Print Background Colours and Images'. We do not recommend the use of Internet Explorer.
Website Help
Page Search
The general page content of the site can be searched by keyword using the search box at top left - simply enter words separated by spaces and press Enter on your keyboard or click the magnifier icon. The results are presented on the Search page.
Page Width
Using the [><] button to the right of the search box the page width can be toggled between a wide version with the menu on the left and a narrow version more suited for smart phones.
Text Size
Alongside are three options to change the size of the text in the main content. See the Web Access page for further details.
Text and Background Colour
These can be changed using the next set of options. Simply chose a colour combination and it will remain in use for all pages until you make a further change.